Cream Cheese Danish
1 Comment
Posted: 10/06/24
Updated: 10/07/24
This post may contain affiliate links. Please read our disclosure policy.


Want to make your own Cheese Danishes? It’s easier than you think! These little bites are filled with a cream cheese filling, wrapped in buttery puff pastry and drizzled with an icing. They’re a delicious way to start your day or satisfy a sweet tooth.
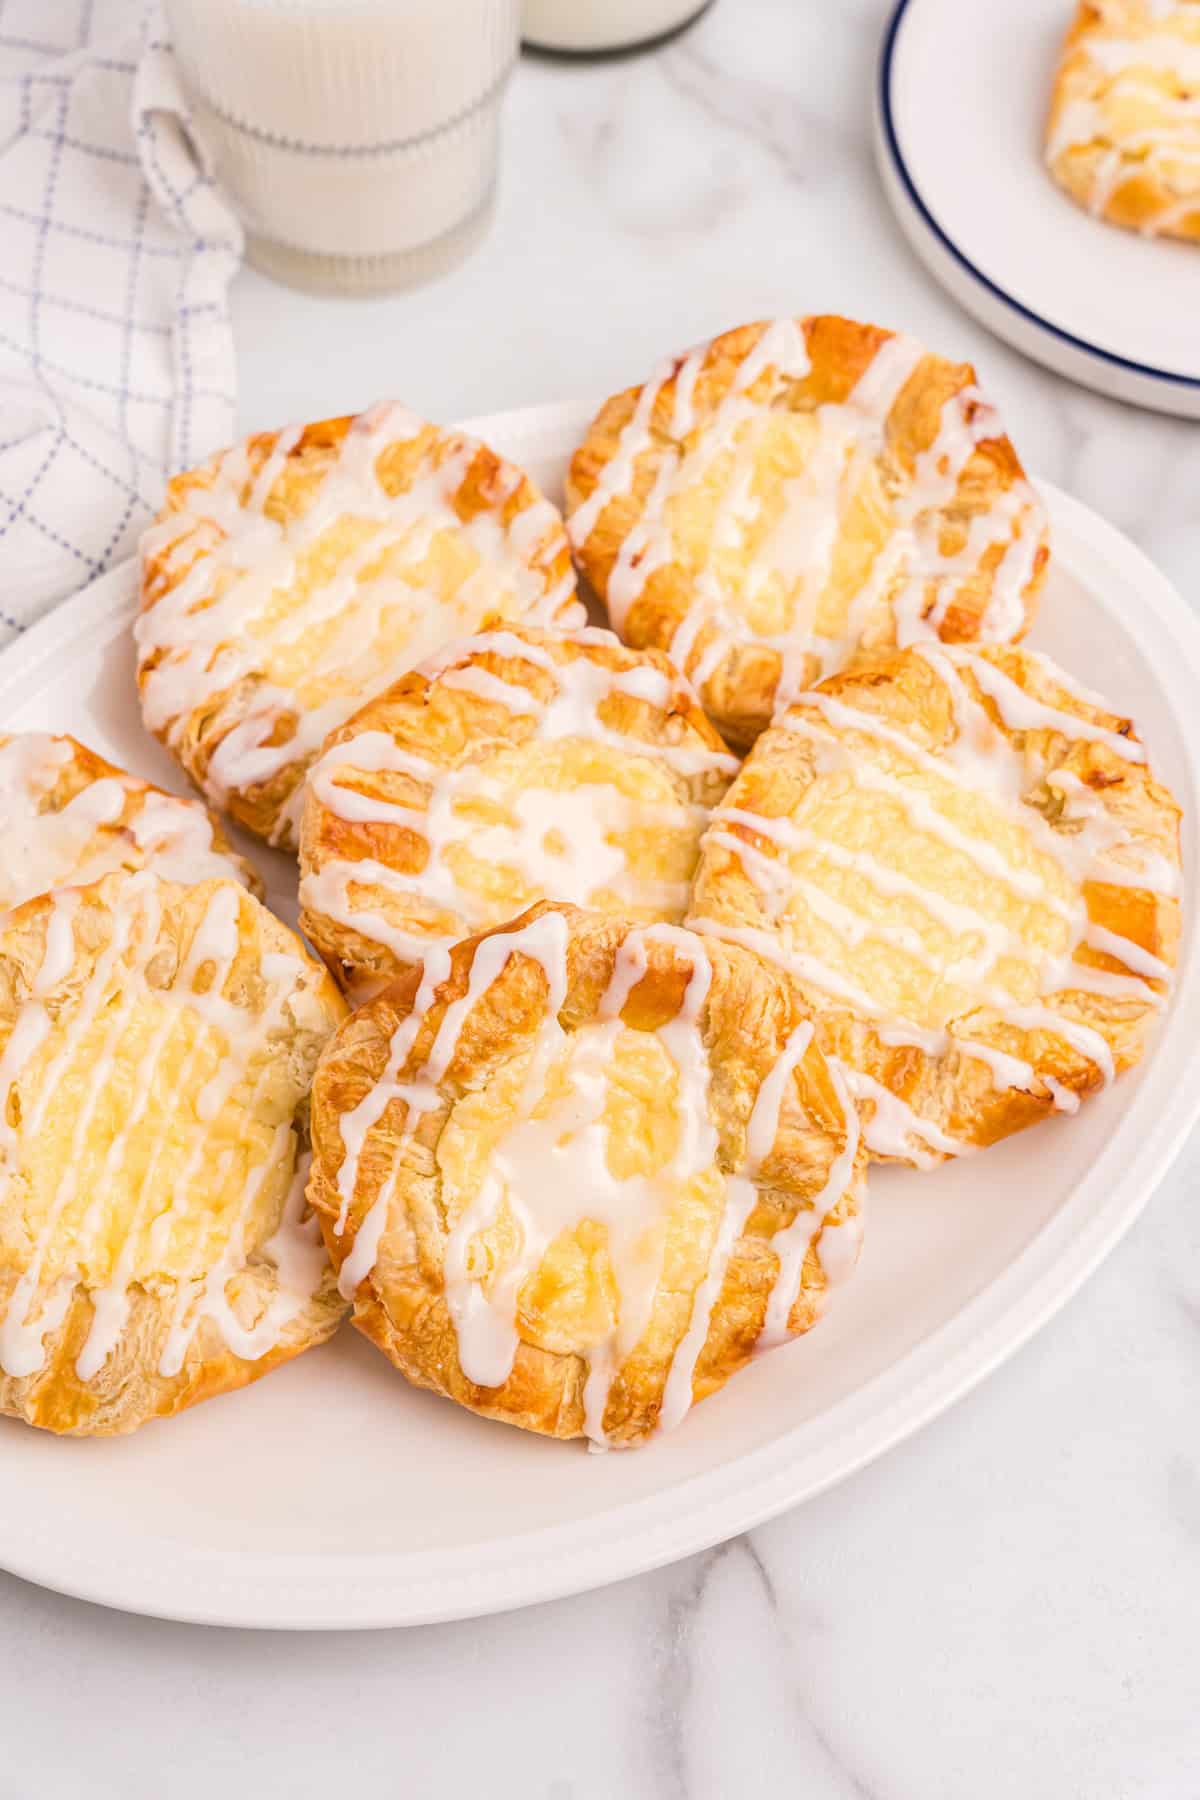
Did you know that you can turn store-bought puff pastry dough into a delicious homemade cream cheese danish? Well now you do! In fact, it’s really really easy to do. This amazing danish recipe uses only a few simple ingredients and always makes the most incredible pastry. It’s perfect for brunches or simply just to have a sweet treat whenever you’ve got a craving.
I love using puff pastry to make savory treat like mini Christmas tree pizzas and bacon pinwheels, but making sweet treats like this danish is so fun too! With a perfectly sweet and creamy center and a crispy and flaky outside, this cream cheese danish is truly irresistible. You’re going to love it!
Why You’ll Love this Cream Cheese Danish
- Skip the bakeries and coffee shop and make these danishes instead. This is a more affordable option!
- It doesn’t take long to make this recipe. Whip it up and serve at a breakfast or brunch!
- Easily double or triple the recipe to make enough danish for a crowd. Perfect for parties and gatherings!
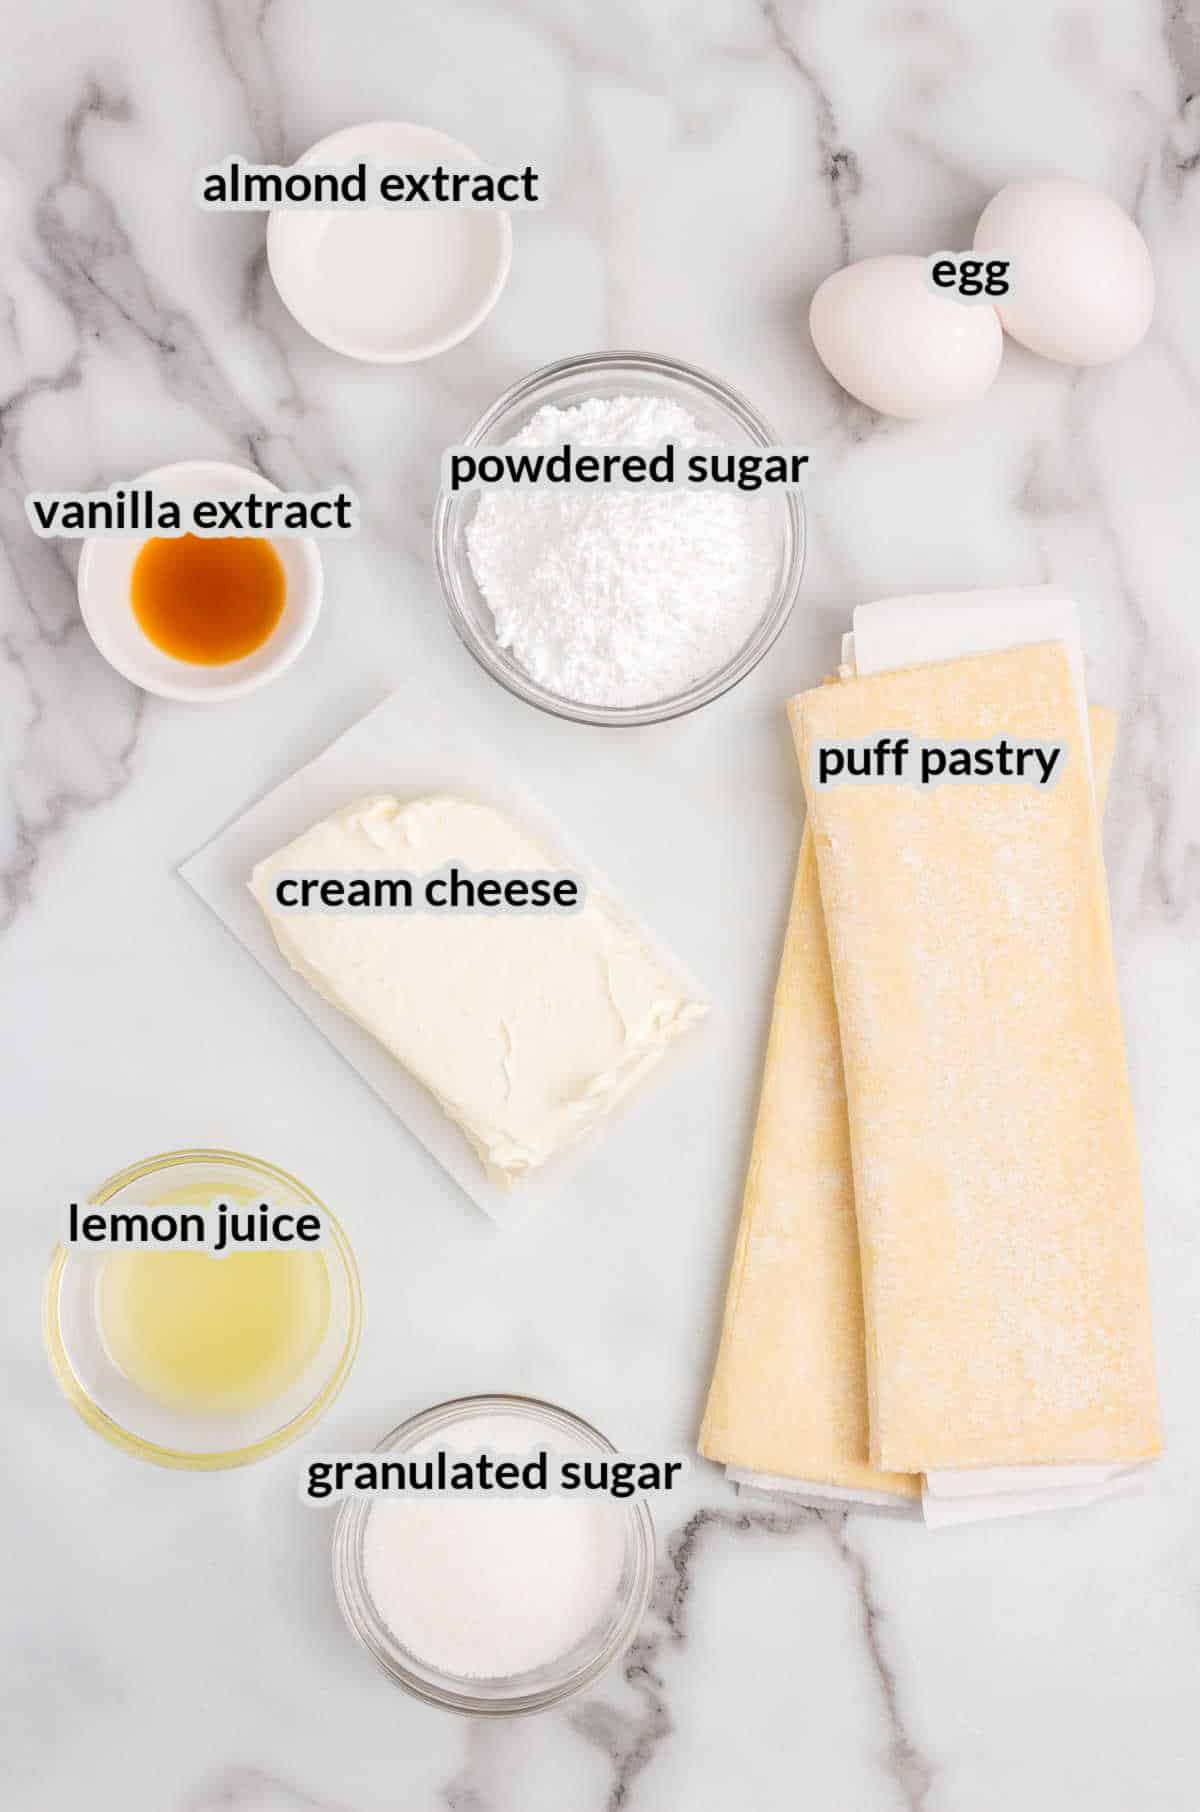
Ingredients for this Cream Cheese Danish Recipe
- Granulated sugar – Sweeten the cream cheese filling with some granulated white sugar.
- Puff pastry – Grab some puff pastry at the grocery store to easily make the most amazing cream cheese danishes!
- Lemon juice – Make some freshly squeeze lemon juice for a simple lemon glaze.
- Cream cheese – For the best flavor and most creamy results, use full fat cream cheese.
- Powdered sugar – To make a really easy glaze for this breakfast treat, use powdered sugar and lemon juice.
- Vanilla extract – Add a little depth of flavor to the cream cheese filling with some vanilla extract.
- Eggs – You’ll need both an egg for the egg wash and a yolk for the cream cheese filling.
- Almond extract – Almond extract is my secret ingredient to the best cream cheese danish ever.
How to Make a Cream Cheese Danish
- Remove the puff pastry sheets from the freezer and packaging. Place on the counter top and allow to thaw for about 40 minutes.
- Meanwhile, let cream cheese and eggs come to room temperature and line two cookie sheets with parchment paper. Set your oven rack to the middle and upper third of the oven, the preheat the oven to 400 degrees Fahrenheit.
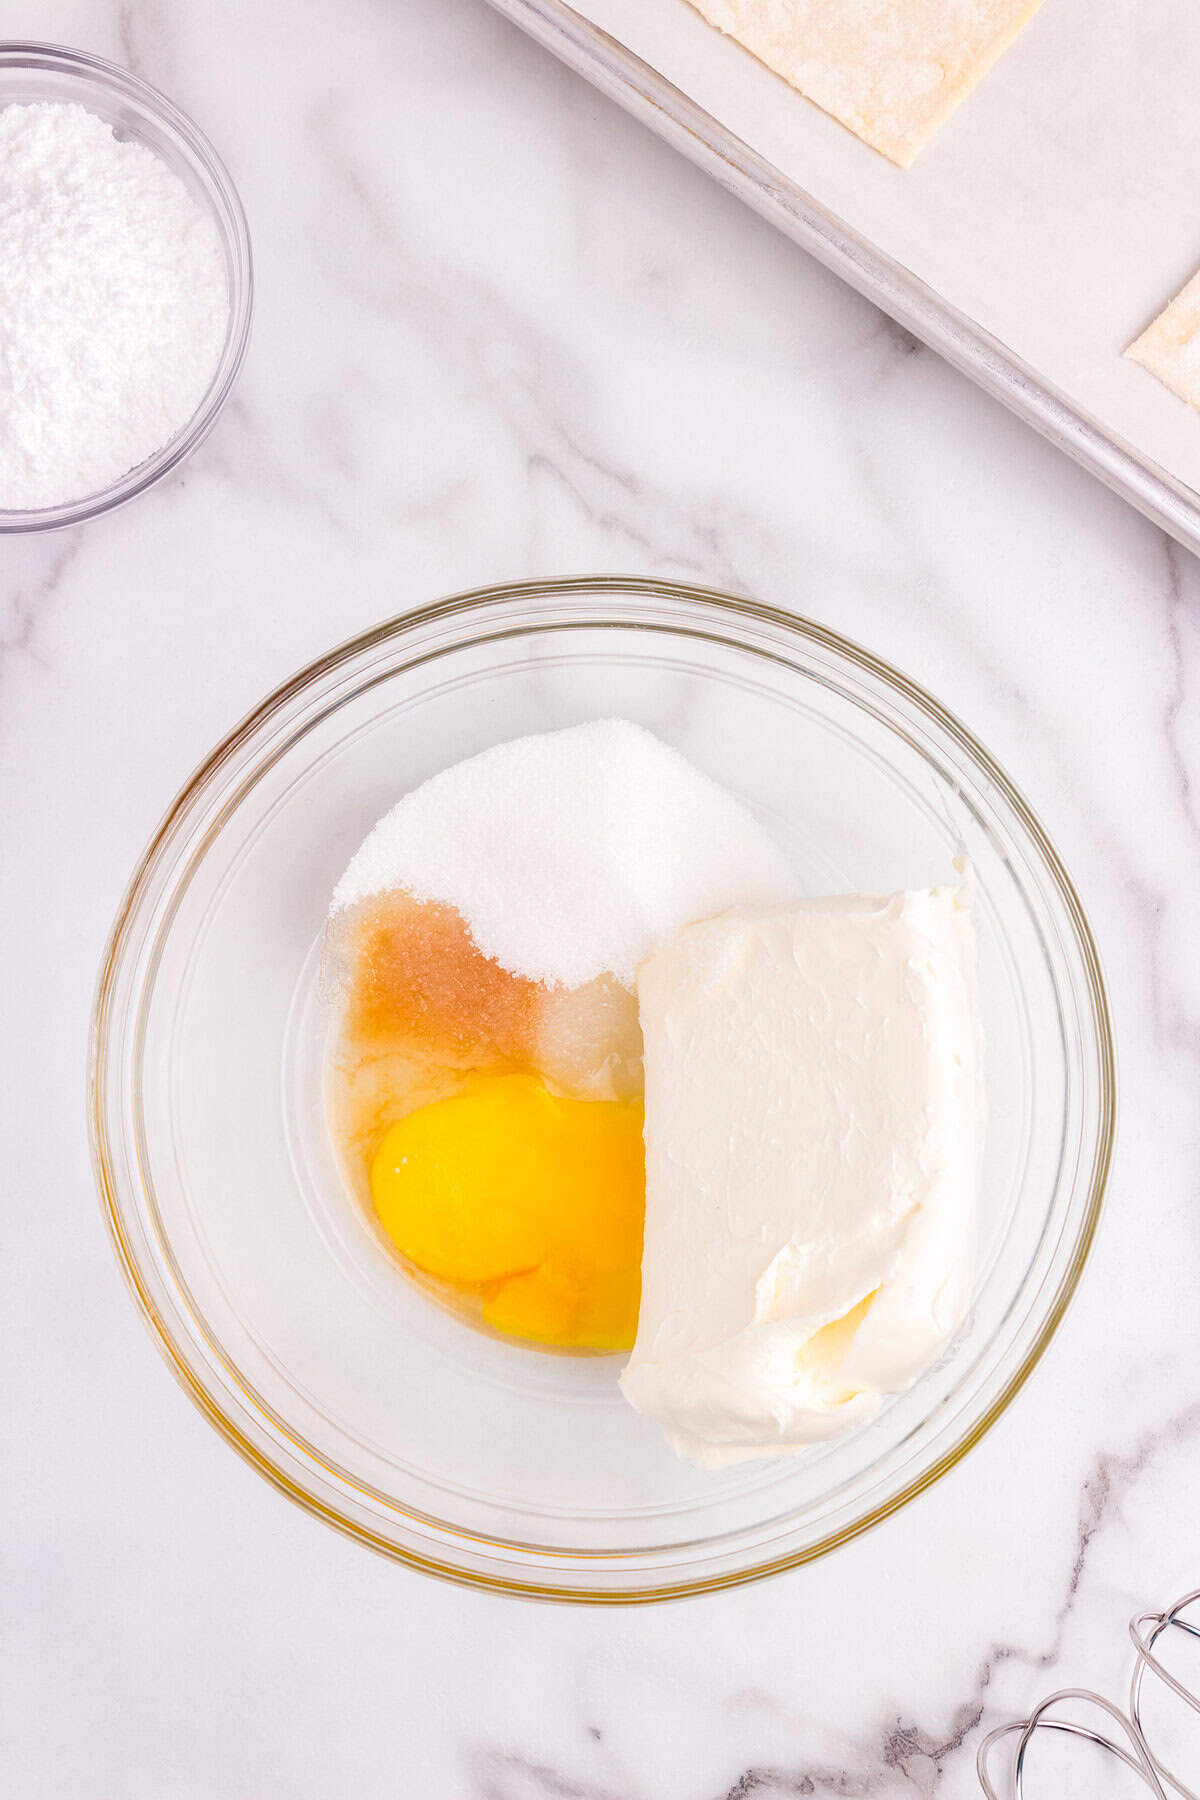
- Once the cream cheese and egg are at room temperature, you make the cream cheese mixture. In a medium sized bowl beat the cream cheese, sugar, egg yolk, lemon juice, and extracts on medium-low speed until combined.
- Scrape the bottom and sides of the bowl and then increase the speed to medium-high and beat until completely smooth.
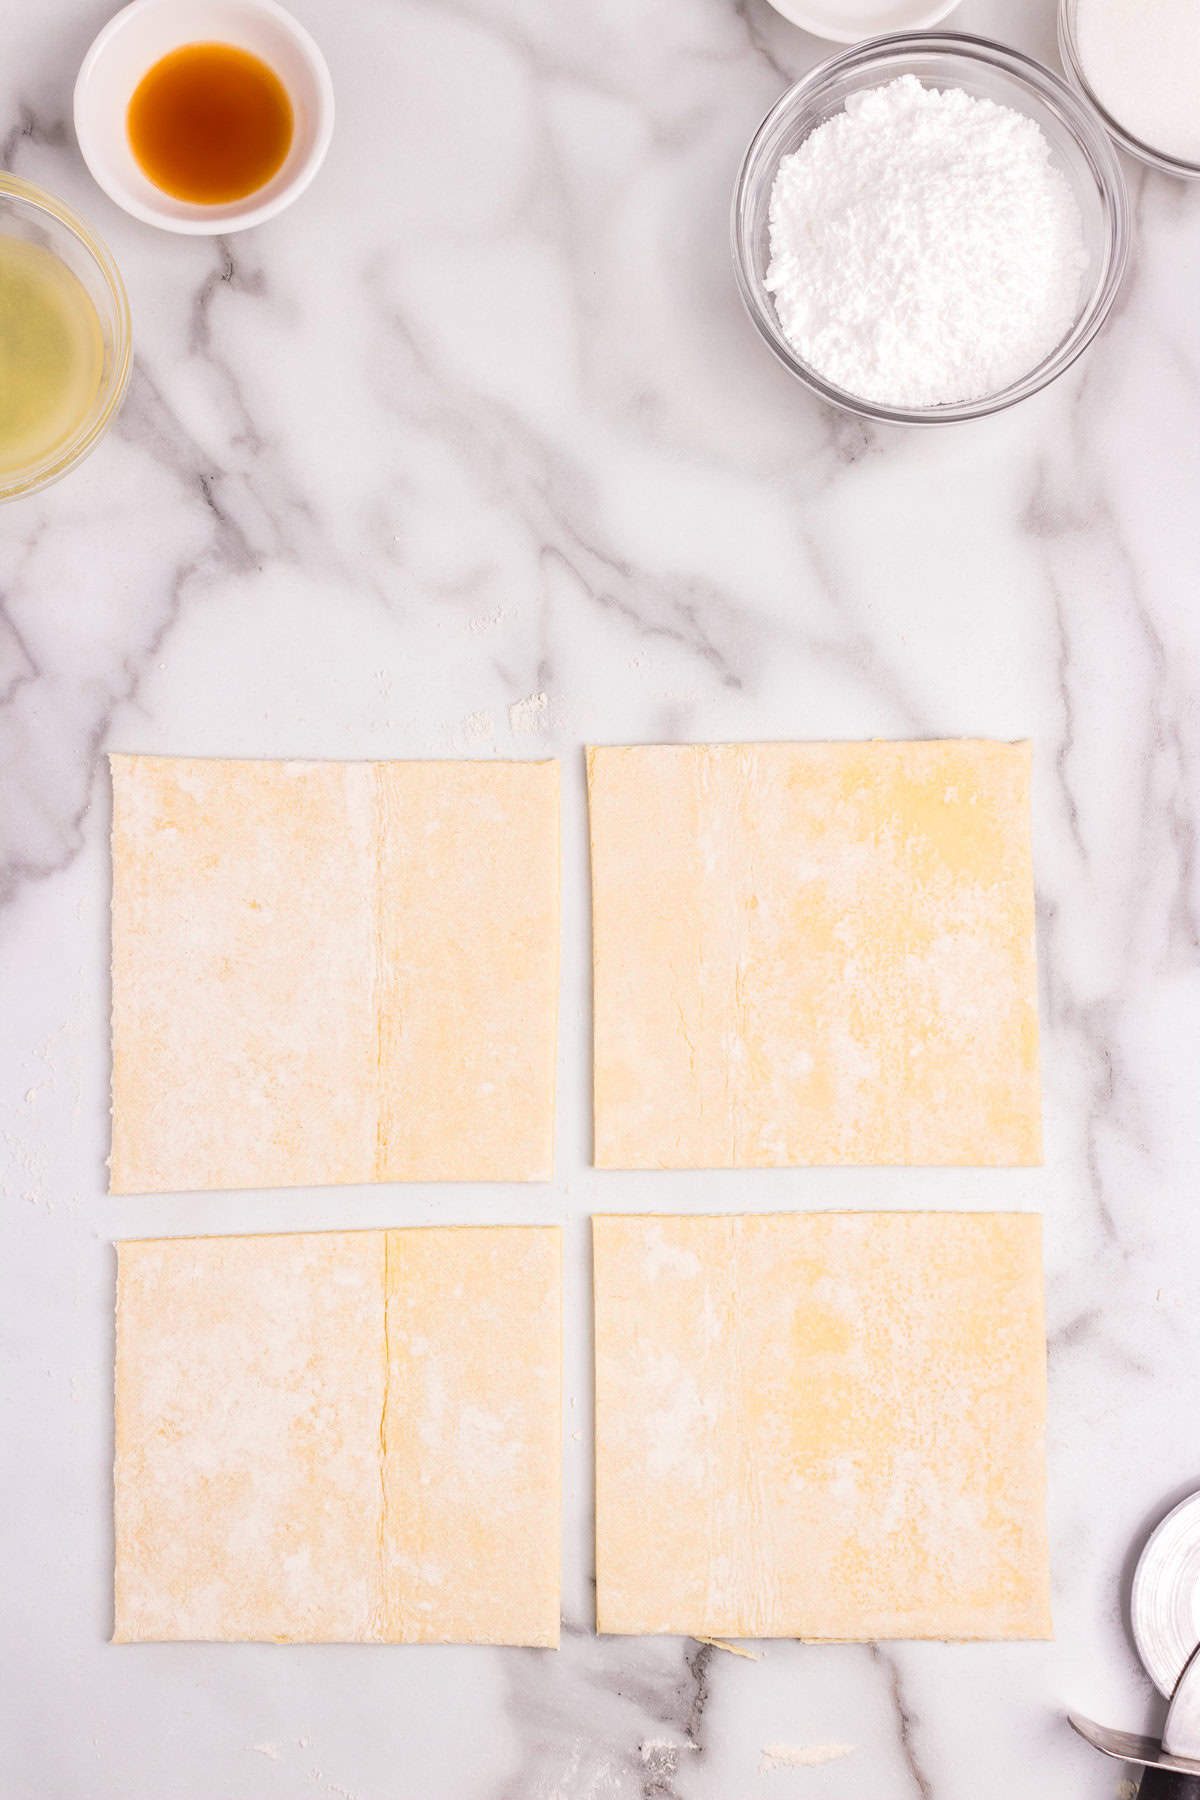
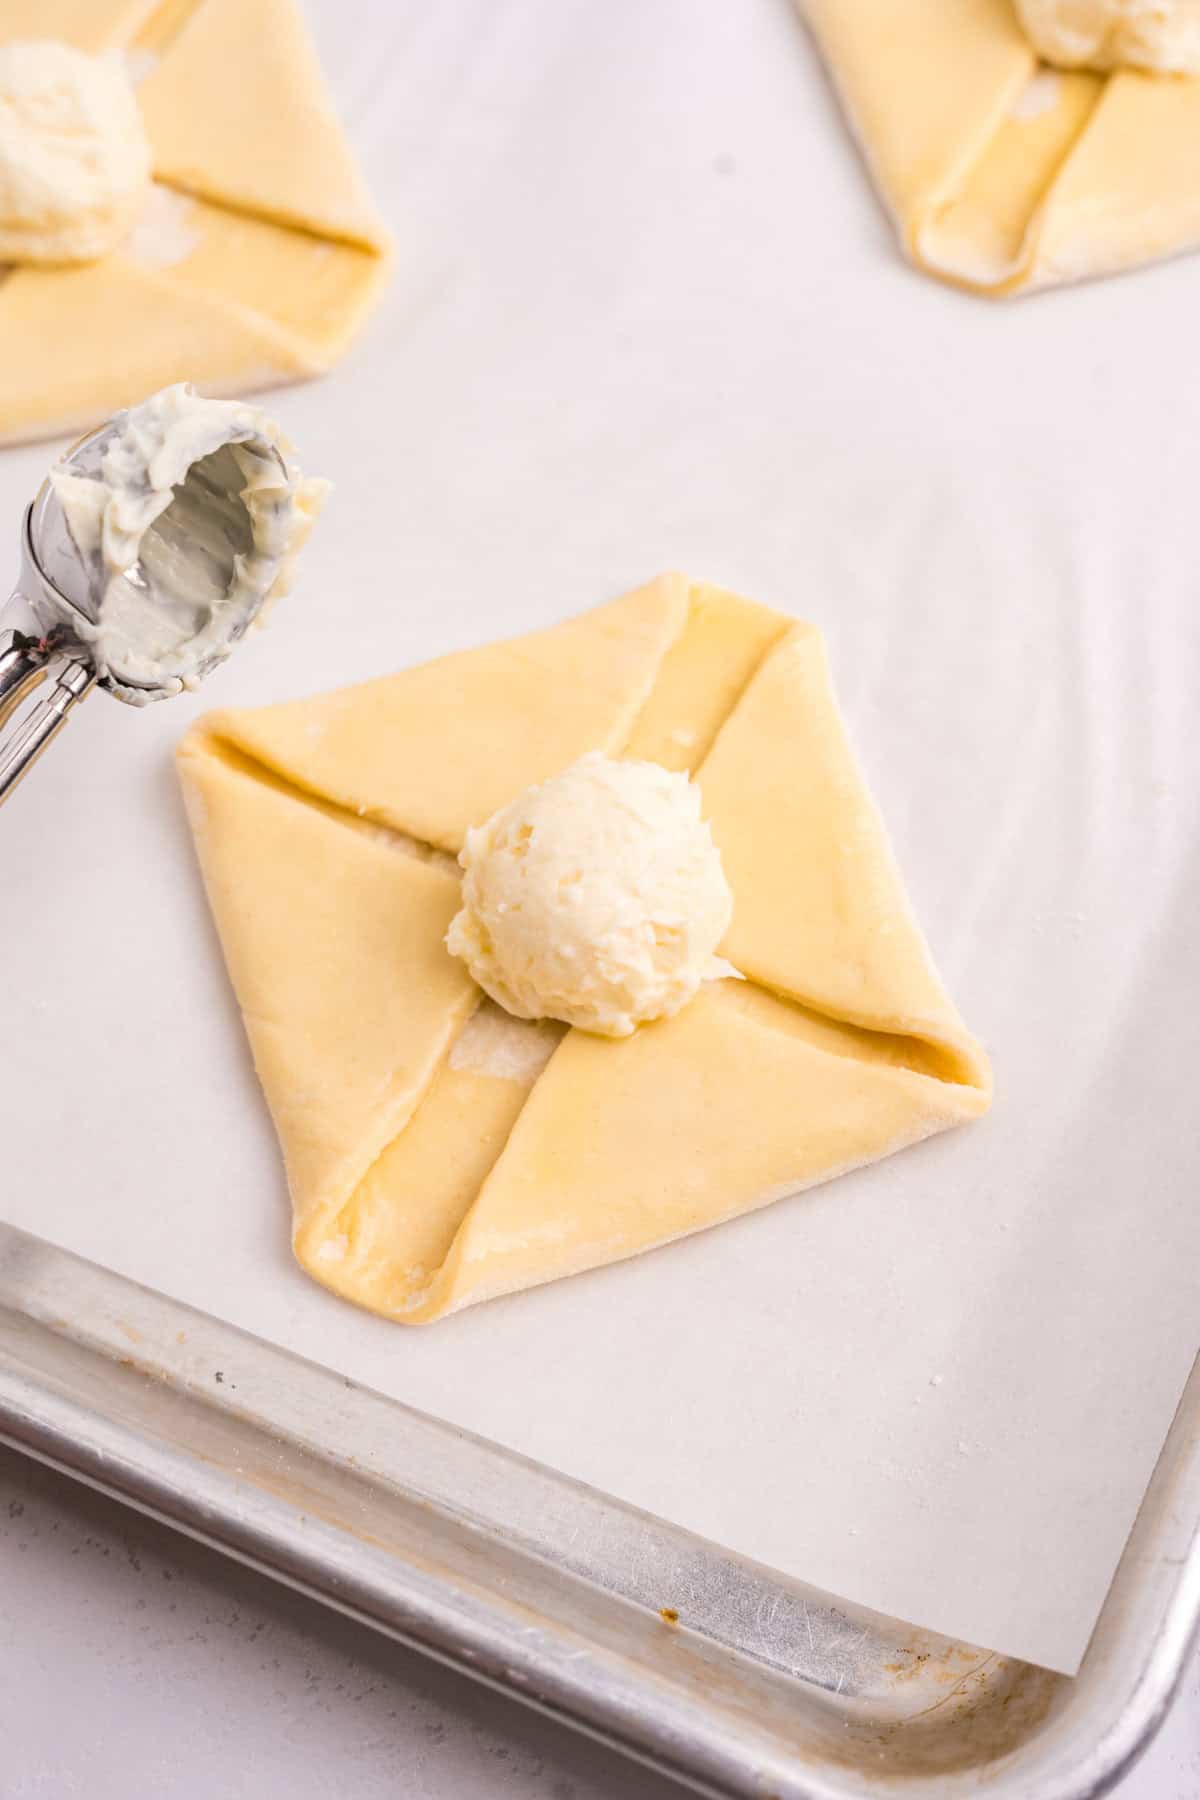
- Roll the puff pastry sheets lightly to smooth the fold lines. Then use a pizza or pastry cutter to cut into four squares. Place the 4 squares on each prepared baking sheet.
- Whisk the egg wash together in small bowl and use a pastry brush to brush the egg wash onto the border of each puff pastry square. Fold in the corners of each of the squares so they look like an octagon.
- Dollop 2 tablespoons of the cream cheese mixture in the middle of each pastry and then brush any exposed pastry dough with the egg wash.
- Bake for 13-15 minutes in preheated oven at 400 degrees Fahrenheit or until golden brown.
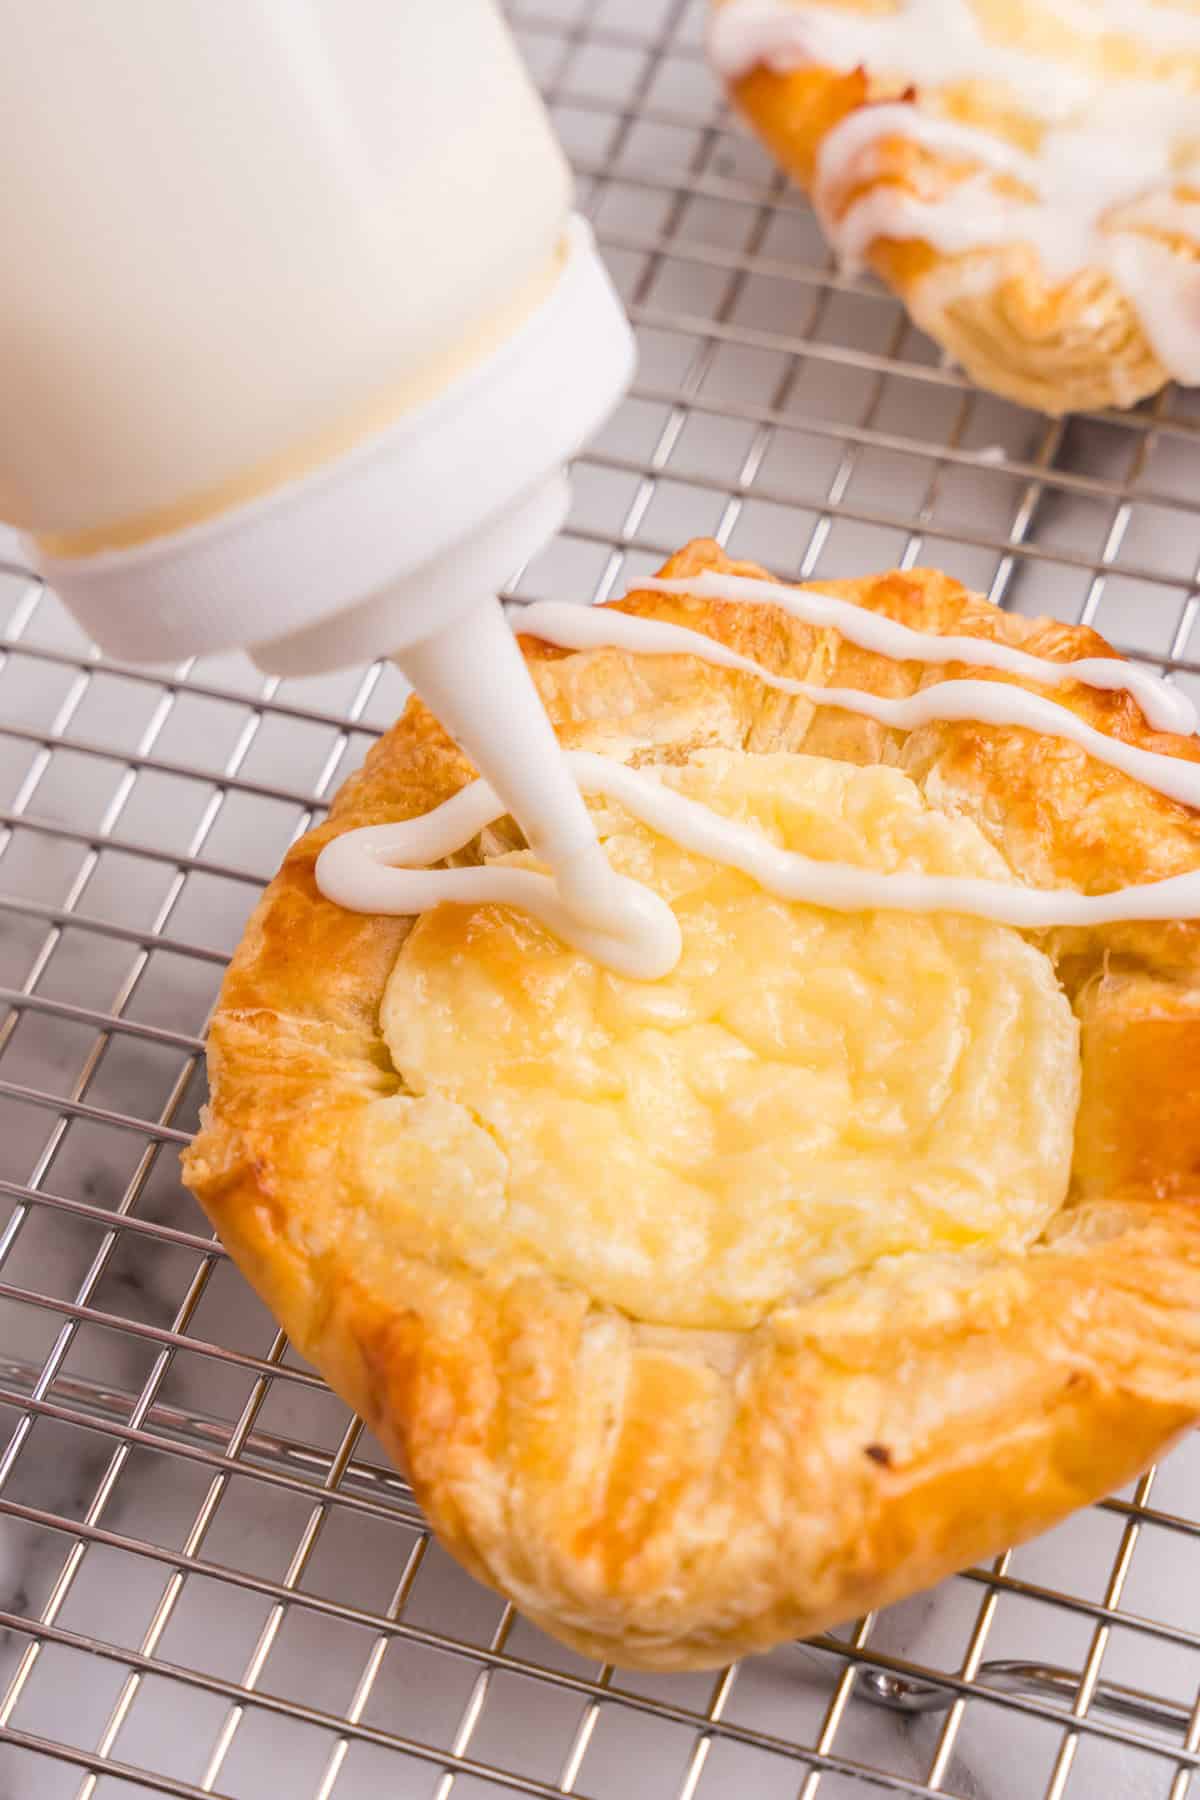
- While the danishes are baking, combine the ingredients for lemon glaze in a small bowl. Whisk until smooth.
- Remove the pastries from the cookie sheets and place onto wire racks. Let cool for at least 10 minutes, drizzle with lemon glaze and serve. The centers will deflate slightly as they cool. Serve warm or at room temperature.

How to Store Leftover Cream Cheese Danish
For best results, store your leftover cream cheese danish in the fridge for best results. Technically, they don’t have to be refrigerated but I find that leftovers last long in the fridge.
FRIDGE: Refrigerate these pastries in an airtight container or zip top plastic bag for 2-3 days.
FREEZER: Flash freeze your cream cheese danishes on lined baking sheet. Then transfer to a freezer bag or airtight container and freeze for up to 3 months.
What can I add to my cream cheese danish?
While this puff pastry cream cheese danish is great as is, there are some tasty toppings you can add! Bake in some fresh fruit like sliced strawberries, fresh blueberries and raspberries are all yummy. Even jam or preserves would be a tasty addition.
You can also swap the lemon glaze on this easy cream cheese danish for a melted chocolate drizzle!
What to Serve with a cream Cheese danish
This pastry doubles as a breakfast treat and an easy dessert, so it pairs with lots of yummy things! Serve with your morning coffee, whether it’s black coffee or a pumpkin spice latte.
You can also serve this with things like sheet pan breakfast or ham and cheese egg muffins. Serving these for brunch? Then pair with fancy favorites like mini quiche cups or a baked omelette.
Pro Tips for the Best Cream Cheese Danish
- Don’t forget to let the puff pastry dough and cream cheese sit out before using. It really makes a world of difference!
- Use a cookie scoop to evenly scoop the cream cheese filling into the squares of puff pastry.
- It’s important to allow the danish to cool before adding the glaze so that it doesn’t just slide off of the pastry.

This easy cream cheese danish is a favorite for sure! Who needs the bakery when you can turn store-bought puff pastry into this masterpiece.
More Pastry Recipes You’ll Love!
- These incredible Cherry Turnovers never get old, and they’re super duper simple to make!
- Need a new fall treat to try? Then check out these amazing Apple Dumplings.
- Embrace the Christmas season with these tart and sweet Cranberry Scones. They’re the coziest treat!
- Want a savory pastry? Then make these fluffy Homemade Crescent Rolls.
Did you make this? If you snap a photo, please be sure tag me on Instagram at @julieseatsandtreats or #julieseatsandtreats so I can see your yummy treat!

Cream Cheese Danish
Indulge in the buttery goodness of homemade Cream Cheese Danishes. These flaky pastries are filled with a rich cream cheese filling and topped with a sweet glaze. They're perfect for a breakfast or a snack.
Video
danishes
Ingredients
Cheese Danish Ingredients:
- 1 pound puff pastry 2 sheets, thawed
Cream Cheese Mixture
- 8 ounces cream cheese room temperature
- ¼ cup granulated sugar
- 1 egg yolk room temperature
- ½ teaspoon vanilla extract
- ½ teaspoon almond extract
- 1 teaspoon lemon juice
Egg Wash Ingredients:
- 1 egg
- 1 Tablespoon water
Ingredients for Lemon Glaze:
- ½ cup powdered sugar
- 1 Tablespoon fresh lemon juice
Instructions
- Remove puff pastry sheets from the freezer and packaging. Place on the counter to thaw for 40 minutes.
- Meanwhile, let cream cheese and eggs come to room temperature. Line two cookie sheets with parchment. Set oven rack to the middle and upper third of the oven. Preheat the oven to 400 degrees Fahrenheit.
- Once the cream cheese and egg are at room temperature, make the cream cheese mixture. In a medium sized bowl beat the cream cheese, sugar, egg yolk, lemon juice, and extracts on medium-low speed until combined. Scrape bottom and sides of the bowl. Increase speed to medium-high and beat until completely smooth.
- Roll the puff pastry sheets lightly to smooth the fold lines. Use a pizza or pastry cutter to cut into four squares. Place the 4 squares on each prepared baking sheet.
- Whisk the egg wash together in small bowl. Brush egg wash onto the border of each puff pastry square. Fold in the corners of each of the squares so they look like an octagon. Dollop 2 tablespoons of the cream cheese mixture in the middle of each pastry. Brush any exposed pastry dough with the egg wash.
- Bake for 13-15 minutes in preheated oven at 400 degrees Fahrenheit or until golden brown.
- While Danishes are baking in a small bowl combine the ingredients for lemon glaze. Whisk until smooth.
- Remove the pastries from the cookie sheets and place onto wire racks. Let cool for at least 10 minutes, drizzle with lemon glaze and serve. The centers will deflate slightly as they cool. Serve warm or at room temperature.

Tips
For best results, store your leftover cream cheese danish in the fridge for best results. Technically, they don’t have to be refrigerated but I find that leftovers last long in the fridge.
FRIDGE: Refrigerate these pastries in an airtight container or zip top plastic bag for 2-3 days.
FREEZER: Flash freeze your cream cheese danishes on lined baking sheet. Then transfer to a freezer bag or airtight container and freeze for up to 3 months.
Nutrition Information
Serving: 1danish, Calories: 474kcal (24%), Carbohydrates: 41g (14%), Protein: 6g (12%), Fat: 32g (49%), Saturated Fat: 11g (69%), Polyunsaturated Fat: 3g, Monounsaturated Fat: 15g, Cholesterol: 53mg (18%), Sodium: 232mg (10%), Potassium: 78mg (2%), Fiber: 1g (4%), Sugar: 15g (17%), Vitamin A: 414IU (8%), Vitamin C: 1mg (1%), Calcium: 36mg (4%), Iron: 2mg (11%)

Elaine says
These look so impressive but are soo easy! Plus, so much cheaper than buying them at the bakery!